Wishful Coding

Didn't you ever wish your
computer understood you?

AppleScript tiling windows

On Linux I use all sorts of key combos to tile windows, even though I no longer use a real tiling window manager.

On Mac OS X my windows are still mostly stacked and all over the place in a big mess. Mac doesn’t even have a proper fullscreen button, other than you know… making it a space on its own.

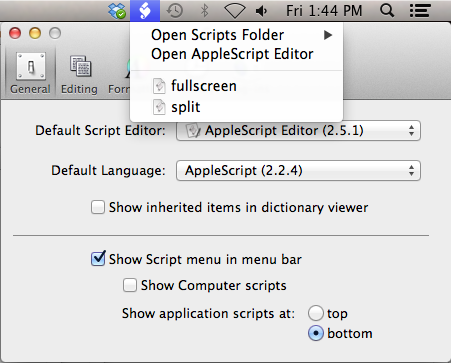
I know there are tools to do the same thing in a more fancy way, but instead I wrote a few AppleScripts to split and maximise windows.

To use them, I placed them in my Scripts folder and enabled the AppleScript menu in the preferences of the AppleScript Editor.

AppleScript Editor preferences

tell application "System Events"
	set frontmostProcess to first process where it is frontmost
	set visible of frontmostProcess to false
	repeat while (frontmostProcess is frontmost)
		delay 0.1
	end repeat
	set secondFrontmost to name of first process where it is frontmost
	set frontmost of frontmostProcess to true
	set frontmostApplication to name of frontmostProcess
end tell

tell application "Finder"
	set screenSize to bounds of window of desktop
	set screenWidth to item 3 of screenSize
	set screenHeight to item 4 of screenSize
end tell

tell application frontmostApplication
	set bounds of the first window to {0, 0, screenWidth / 2, screenHeight}
end tell

tell application secondFrontmost
	set bounds of the first window to {screenWidth / 2, 0, screenWidth, screenHeight}
end tell
tell application "System Events"
	set frontmostProcess to name of first process where it is frontmost
end tell

tell application "Finder"
	set screenSize to bounds of window of desktop
end tell

tell application frontmostProcess
	set bounds of the first window to screenSize
end tell
Published on

All NXT building instructions now free

I thought long and hard about this, as a lot of effort went into making these building instructions, but I concluded that I feel better about sharing them with as many people as possible than sharing them with a handful and making a few bucks.

So I’m happy to announce that all the instructions I made so far will be available for free. Go check them out.

I haven’t been writing a whole lot in the past months, but I feel some things breeding and I’m also super excited about the new EV3 coming out this year.

Published on

Team Relay Chat: File Sharing and Registration

Almost a month ago I uploaded the first version of Team Relay Chat, now I have a couple of users and some nice new features to show you.

Registration

Previously it required several not-so-trivial steps to add a user to your IRC server. Now you can just enable the registration module. Your employees will be able to just pick a user name and password and be good to go.

registration page

File Sharing

I realised file sharing was important right from the beginning. It has been possible to share files from the web interface for quite some time now, but I added two important features.

You can now share files from your desktop client too. Just send them to Hubot via DCC, and Hubot will take care of uploading them.

The web client now displays a preview of uploaded images inline. No more no less.

Documentation

I’m working hard to make TRC as easy to use as possible. Both by just making things simpler and by writing documentation and even doing some videos.

All of this can be found at teamrelaychat.nl/wiki

Log Viewer

ZNC comes with a lovely logging module that stores log files of all your chats in a folder deep inside the server.

It is now possible to browse all these files via the ZNC web interface. This interface will grow even better in the next few weeks.

Firewall friendly

Nowadays almost everyone is behind a NAT or firewall, and I’ve been working to make sure you can use Team Relay Chat even then.

Alternative IRC ports

You can now configure ZNC to listen on any port you want, even lower port numbers like 25(SMPT) or 80(HTTP) are supported. So even if port 6697 is blocked, you can still chat.

Passive DCC SEND

File sharing from the desktop uses DCC. Normally this means the sender(you) opens a port from which the receiver(hubot) downloads the file. This means you have to forward external ports to your machine.

However, Hubot also support passive DCC. In this case Hubot opens a port and you simply upload the file. No configuration needed.

Conclusion

You should try the demo server(with SSL) and read more.