Wishful Coding

Didn't you ever wish your
computer understood you?

Playing Minecraft Offline

Me and my friends like to play Minecraft sometimes, but it often happens to be in the middle of nowhere, without internet. The most interesting part is most often the setup, not the playing.

We usually start by sharing the latest Minecraft binaries and setting up an ad-hoc WiFi network. Then someone boots a server, and we’re set… NOT!

Minecraft usually performs some DRM and verification with the Minecraft website. For the server, this can be disabled by setting online-mode to false in server.properties, but with the client, you’re out of luck.

Initially, the solution consisted of sending someone with a smartphone out to find an open WiFi network. Later, before the new launcher, it used to be possible to fake the login server1. But recently, I found a way to play in offline mode on the client as well.

Spoiler alert: Minecraft is The Matrix.
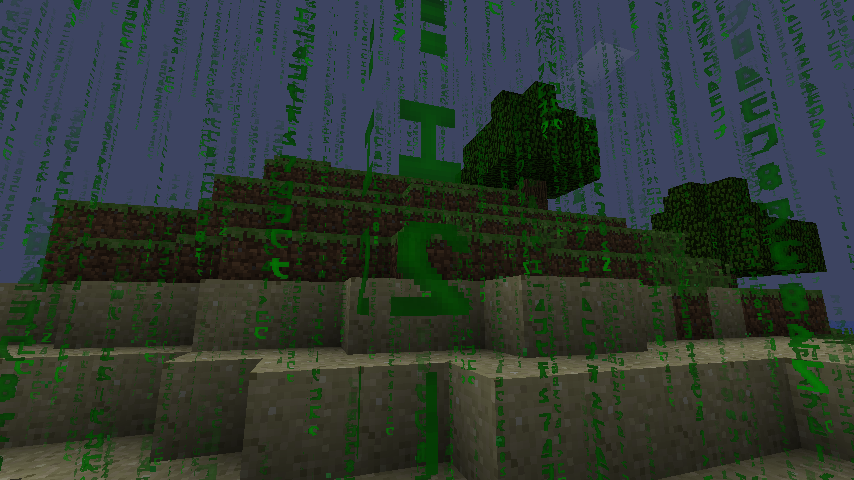
Minecraft Matrix

That’s it. It had to be said. Now, let’s hack Minecraft Matrix style.

Normally, when you click “Play Offline” after a failed login, you are named “Player”, which means that you are going to kick each other because you all have the same name.

Now, fire up your terminals2, and change directory to the bin folder of your Minecraft directory3.

Now, I can’t read and write Matrix like Mouse4, but luckily, the GNU toolchain can. What we’re going to do is change a few occurrences of “Player” with any string of equal length5.

The first step is to extract the jar. It turns out it works just fine as a directory, and it’s much easier to work with that way.

mv minecraft.jar minecraft-orig.jar
mkdir minecraft.jar
cd minecraft.jar
jar -xf ../minecraft-orig.jar

Now we need to figure out which files need to be modified. Beware of Déjà vu!

grep -r Player .
# Binary file ./ei.class matches
# ./lang/stats_US.lang:stat.playerKills=Player Kills
# Binary file ./net/minecraft/client/Minecraft.class matches
# Binary file ./net/minecraft/client/MinecraftApplet.class matches
# Binary file ./ow.class matches

Some experimentation shows that MinecraftApplet.class is the one that matters. Now you need to use sed to replace “Player” with another name of equal length5.

Mac users will need to install GNU sed, as BSD sed scrambles the binary file beyond repair. I used brew install gnu-sed, but Macports and Fink might also work.

gsed -ibak s/Player/_Notch/g net/minecraft/client/MinecraftApplet.class

Done!

  1. Not anymore, it uses SSL now. 

  2. Mac users can use the “Homebrew” style at fullscreen for extra Matrix factor. 

  3. Mac: ~/Library/Application\ Support/minecraft/bin, Linux: ~/.minecraft/bin, Windows: ~/.AppData/Roaming/.minecraft/bin 

  4. Mouse, please tell me how you wrote the lady in the red dress. 

  5. Equal length you hear me, you’ll crash Minecraft otherwise.  2

The NoSQL Burden

Some people claim that NoSQL is premature optimization and places an extra burden on the developer. The main points seem to be that NoSQL has no schemas and drops consistency in favour of the other parts of CAP(availability, partitioning).

I largely agree, however, I think we should differentiate between two kinds of NoSQL databases.

  1. ScaleDB: Hard-core MapReduce, thousands of nodes, sacrifices everything for speed and scalability. If you use this below Google-size, you have no idea what you’re doing.

  2. EasyDB: Relax, life is to short to update your schema and master SQL, give me an easy API to persist and query my data and I’ll be happy. I really think some NoSQL databases should realize this and drop scalability as a prepackaged buzzword feature and focus on the real needs of the majority of their user base.

Relax, does that word ring a bell? It’s the tag line of CouchDB. With its nice REST API and with replication as the only way to scale horizontally, I think CouchDB classifies as an EasyDB.

However, CouchDB uses MVCC, this avoids locking and provides a form of consistency, but it does place the burden of handling update conflicts on the client. Or… does it?

CouchDB concurrency

I would like to draw a parallel with how Clojure handles controlled shared mutable state. The simplest form present in Clojure is the Atom.

An atom is a MVCC construct that provides a low-level compare-and-set! function that executes an atomic update if the expected old value matches the actual value. Much like CouchDB compares the _rev of a document before updating.

Interestingly, though, atoms also provide the very convenient swap!, which takes a pure function that takes the old value and returns the new one. swap! calls compare-and-set! in a loop, recomputing the new value on every iteration until the update succeeds.

So what about CouchDB? Can we have easy fire-and-forget updates there as well? Yes we can! I previously hacked together an atom implementation on top of CouchDB, but it turns out CouchDB already offers a little known feature called Document Update Handlers, which does exactly this.

Sadly, the Clojure view server included with Clutch does not yet include support for document update handlers, but this can be easily remedied!

Lion Hacks

I installed Mac OS X 10.7 Lion on my Mac yestereday. It did not went very smooth. I’m not going to do a review, but I am going to share my story and some tricks used along the way.

Backup

Always backup, always, and make sure it works.

I run Time Machine backups on an external 500GB HDD, but TM has the nasty habbit to gobble up all available disk space. So when I wanted to make a disk image of my complete HD, I had to remove the TM backup.

Then I did something stupid, and proceeded with the installation without checking the image worked.

Trick: Remove Single Revision

Go into Time Machine to the revision and folder you want to remove. Now right-click and select “Delete Backup”.

Note that the UI is not suitable for removing all but a few revisions, which is why I opted to remove the whole thing.

Trick: Limit Time Machine space

Only after I was finally running Lion did I discovered a way to limit the disk space used by Time Machine.

There are a few complicated hints to achieve this for remote volumes, but nothing for local ones.

This trick involves another Mac, because Lion refuses to connect to a “remote” disk that is actually the local disk shared over AFP.

First, we need to trick Time Machine into using a sparsebundle instead of plain files.

  1. Connect the disk to another Mac
  2. Share it in System Preferences
  3. Initiate a backup, so that a sparsebundle is created
  4. Cancel the backup and disconnect the drive

Now Time Machine will continue using the disk image when the drive is connected directly. The only thing that remains is to limit the bundle in size, using this command:

hdiutil resize -size 150G -shrinkonly /path/to/image.sparsebundle

Where 150G and /path/to/image.sparsebundle need to be replaced with the desired size and the path to the bundle, residing on your backup drive.

Installation

You’re normally supposed to install Lion straight from the App Store, but some smart guy found out you can burn your own DVD or USB drive.

I ended up going the DVD route, because my main drive appeared unbootable by the installer and my USB stick was a few MB to small.

Possible trick: Clean install without DVD

I could not try this because of my broken HD, please let me know if it works.

Lion installs a recovery partition, which plays an important role in the installation. You can’t simply replace a running system, you know.

Run the installation straight from the App Store up to the point where you need to reboot. Now the trick is to hold ⌘R to boot into the recovery mode rather than into the installer.

Now, use Disk Utility to wipe your disk, and run the full installation from the recovery partition.

Migration/Recovery

As I said, I did a clean install, wiped my drive, but forgot to check the image works. tension… It did not work of course.

The right way, of course is to always make sure your Time Machine backup or your disk image works, and to verify and repair your hard drive before you make an image or upgrade.

If you do all of that, Mac has a neat Migration Assistent which can import your old data.

Trick: Mount correct image of damanged partition

Disk Utility is able to perform first aid on damaged disk images, but apparently not mine. Another weird thing is that the checksum matched, but no mountable volumes where found.

So what I have is a working image of a broken disk.

Luckly HFS+ has a feature called journaling, to recover from a bad state, but Disk Utility told me that the journal could not be replayed because the media was read-only.

After using Disk Utility to convert the disk image to read/write, it would mount, and let me extract my files, but upon applying first aid, matters got worse again, and Disk Utility told me to take my files and ruuuun!

Settling in

This part went pretty smooth. I’m swapping some software, waiting for some Lion updates, and looking at all the things that go swoosh.

Homebrew is in, Macports is out. Homebrew makes sysadmins cringe, because it’s written by a “Ruby hippie” that has no sens for dependency management. It does not include its own copy of everything included in OS X, which saves a lot of time and space IMO.

I read iChat is now extensible to support “legacy” protcols, like MSN. Because I’m barely using MSN and becaus everyone is hiring Adium devs, I’m using iChat now. I’ll wait until someone staples libpurple to iChat.

I also heard Growl 1.3 will be a sexy Lion app available in the App Store. Not sure if I’ll wait or install 1.2 anyway.

One thing that has to be done in Lion is un-dumbing Finder.

  1. Customize the toolbar to include that path widget
  2. Show full paths defaults write com.apple.finder _FXShowPosixPathInTitle -bool YES
  3. Show hidden files defaults write com.apple.finder AppleShowAllFiles -bool YES

Then restart finder, ` killall Finder`

Good luck!