After I upgraded to 1000Mbps fiber and discovered my ISP has remote access to my router, I wanted a new router, and some friends conspired with Linus Tech Tips to convince me that your router sucks, build your own instead! This is my journey through building my own router and eventually ending up with an off the shelf TP-Link Omada setup.
The TL;DR is the only thing that actually sucks about your router is the WiFi coverage. Use the wired network and/or put some extra access points in strategic locations.
Literally any router can do 1000Mbps, which is enough for multiple 4K video streams. But chances are the router is stuffed away somewhere in a corner of the hallway. Of course WiFi on the other end of the house is going to suck. The solution is simple: place some extra access points in strategic locations throughout the house.
Requirements
But let’s go back to the beginning. Since we’re both working from home, I had just upgraded our internet to the fastest fiber available in the area, 1000Mbps, and in the progress discovered I can change my WiFi password from the website of my ISP, meaning my ISP has remote access to my router. Not cool. And if I was going to revise the setup, I had a few other ideas
- Better WiFi coverage upstairs
- Power over Ethernet for the access points
- Put IoT devices on their own VLAN
- Get rid of the media converter and plug fiber directly into the router
- Get rid of the Raspberry Pi home server
- Prepare for an eventual 10GbE upgrade
And from there it went a bit like this. And like my Linux journey, there came a point where I just want stuff to work reliably rather than always having the new hotness.
The Hardware
The idea was that if I used a repurposed thin client combined with a PoE switch, that I could plug in an SFP+ card for a fiber transciever and an easy 10GbE upgrade path, transfer the Raspberry Pi’s duties to the thin client, and power the access points from the PoE switch.
The easy part was picking access points. I just selected some TP-Link Omada WiFi 6 access points. For the switch I initially selected a fairly simple PoE switch, but then realised I’d need a managed switch for my IoT VLAN, and then I figured why not an Omada managed switch so I could control everything from one place. But, foreshadowing, the Omada managed switch wasn’t that much cheaper than a full Omada PoE router with built-in controller.
At this point I was under the impression my fiber was GPON and not compatible with the available SFP trancievers, so 10GbE SFP+ cards would be for another day. Finding a network card was actually the hardest, because many of the older and cheaper NICs have a higher TDP than would be wise to put into such a small PC, and often use brands that don’t have great support in DPDK or FreeBSD. Eventually I found a two port Intel NIC.
For the thin client, I spent a bunch of time searching for ones that have PCIe slots, such as the HP t620 PLUS, Fujitsu FUTRO S920, and the final choice, Lenovo ThinkCentre M720 Tiny. The Fujitsu is a much cheaper option, but I had 10GbE in mind and also wanted to use it as a home server, so opted for a bit more powerful machine. Serve The Home was a great resource in this journey.
Here is where the setbacks started:
- The PC turned out to have a 2.5” drive where the NIC should go, so I had to buy an NVMe SSD.
- It actually doesn’t have a standard PCIe slot, so I had to buy a riser and use some double sided tape in lieu of a front plate/bracket.
- The fan is so loud! Probably just worn out? So I had to find a replacement fan on eBay, which at the time of writing hasn’t arrived yet.
At this point I was having my doubts, but sunken cost fallacy kept me going. I also just like to play with tech toys. So once the riser arrived I proceeded to set it up as a router.
The software
At first I was planning to go with OpnSense, but then a friend told me that kernel mode routing is so slow, and all the cool kids use DPDK these days, so why not use DANOS or VPP? Who needs a web GUI anyway. [Week six]
So I installed Ubuntu Server and VPP, and then moved on to their VPP as a home gateway page.
What that page neglects to mention is how to get your kernel to give up the normal network driver so that DPDK can use it.
It turns out that if you apt install dpdk it installs a service that automatically does this for you after you obtain the IDs of the NIC with lspci and add them to /etc/dpdk/interfaces:
pci	0000:01:00.0	vfio-pci
pci	0000:01:00.1	vfio-pci
Then I decided I wanted to use dnsmasq as both the DNS and DHCP server, which has the benefit that you can access your devices by their hostname. I settled on the following /etc/dnsmasq.conf which binds to the VPP bridge interface, ignores, resolv.conf, uses Google DNS, a .lan domain, adds DHCP hosts to the DNS, sets the gateway to VPP, and the DHCP server to itself.
interface=lstack
no-resolv
server=8.8.8.8
server=8.8.4.4
local=/lan/
domain=lan
expand-hosts
# Set default gateway
dhcp-option=3,192.168.5.1
# Set DNS servers to announce
dhcp-option=6,0.0.0.0
When I was setting up VPP, the configuration files they provided were essentially broken, resulting in a long struggle to get NAT working. The documentation has since been updated, which is potentially a better reference than below config.
/etc/vpp/startup.conf:
unix {
  nodaemon
  log /var/log/vpp/vpp.log
  full-coredump
  cli-listen /run/vpp/cli.sock
  startup-config /setup.gate
  gid vpp
  poll-sleep-usec 100
}
api-trace {
  on
}
api-segment {
  gid vpp
}
socksvr {
  default
}
dpdk {
	dev 0000:01:00.0
	dev 0000:01:00.1
}
plugins {
	plugin default { disable }
	plugin dpdk_plugin.so { enable }
	plugin nat_plugin.so { enable }
	plugin dhcp_plugin.so { enable }
	plugin ping_plugin.so { enable }
}
setup.gate:
define HOSTNAME vpp1
define TRUNKHW GigabitEthernet1/0/0
define TRUNK   GigabitEthernet1/0/0.300
define VLAN 300

comment { Specific MAC address yields a constant IP address }
define TRUNK_MACADDR 90:e2:ba:47:df:ec
define BVI_MACADDR 90:e2:ba:47:df:ed

comment { inside subnet 192.168.<inside_subnet>.0/24 }
define INSIDE_SUBNET 5

define INSIDE_PORT1 GigabitEthernet1/0/1

exec /setup.tmpl
setup.tmpl:
show macro

set int mac address $(TRUNKHW) $(TRUNK_MACADDR)
set int state $(TRUNKHW) up
create sub-interfaces $(TRUNKHW) $(VLAN)
set int state $(TRUNK) up

set dhcp client intfc $(TRUNK) hostname $(HOSTNAME)

bvi create instance 0
set int mac address bvi0 $(BVI_MACADDR)
set int l2 bridge bvi0 1 bvi
set int ip address bvi0 192.168.$(INSIDE_SUBNET).1/24
set int state bvi0 up

set int l2 bridge $(INSIDE_PORT1) 1
set int state $(INSIDE_PORT1) up

comment { dhcp server and host-stack access }
create tap host-if-name lstack host-ip4-addr 192.168.$(INSIDE_SUBNET).2/24 host-ip4-gw 192.168.$(INSIDE_SUBNET).1
set int l2 bridge tap0 1
set int state tap0 up

nat44 forwarding enable
nat44 plugin enable sessions 63000
nat44 add interface address $(TRUNK)
set interface nat44 in bvi0 out $(TRUNK)
Note that without the poll-sleep-usec command, the CPU will be at 100% all the time, which is not very power efficient. But taking a high performance user space dataplane for low latency and then inserting a delay seems kinda pointless doensn’t it? But even with the delay, it was plenty fast in my testing, saturating the uplink without any obvious extra latency.
One significant difference in my config is that my ISP requires a VLAN of 300 on the WAN port, which was another struggle. The solution is that you have to set up a sub-interface like GigabitEthernet1/0/0.300 which will add the VLAN tag on outbound traffic and strip it on inbound trafffic. You then have to use this subinterface for all further setup.
Sinking the costs
While initially I tested VPP as a secondary router behind the ISP router, the VLAN struggle had to happen while my girfriend was without internet, another moment of realisation: I am now managing a sever exposed to the public internet, and if there is an issue we’re without internet access. Do I want that kind of responsibility for fun?
Is there any way I can justify this project? Time to do some testing. First I ran speedtest.net on the ISP router and the VPP router, and the results are pretty much indistinguishable. Around 8ms latency and 930Mbps up and down. But then my friend said the real test is packets per second, not just megabits, so I went to iperf3 and basically failed to run any test that would show a significant difference. That is, UDP tests with small packets would just kinda hang, and TCP tests would report similar numbers to Speedtest.
The other metric I looked at is wall power. Turns out the Raspi uses around 2W and the ISP router 18W, while the VPP router uses 20W. I slightly rounded the numbers for effect, but it’s not an obvious win. And that’s without the access point and switch this setup would need.
So in the end it’s not faster or more efficient, and a hecking lot more maintenance. Assuming the new fan would be sufficiently silent. And then my girlfriend said her Skype calls kept dropping upstairs, which is when I decided to quit messing around and buy a setup that just works.
The Omada Hardware
At this point I had kind of dismissed 10GbE as uneccessery, expensive, and power hungry. It also occured to me that if routers were actually bad, router companies would be put out of business by kids selling preconfigured pfSense thin clients. So I asked the owner of Routershop.nl for advice, and just bought whatever he recommended.
- TP-Link Omada SDN TL-ER7212PC
- TP-Link Omada SDN EAP653 Slim
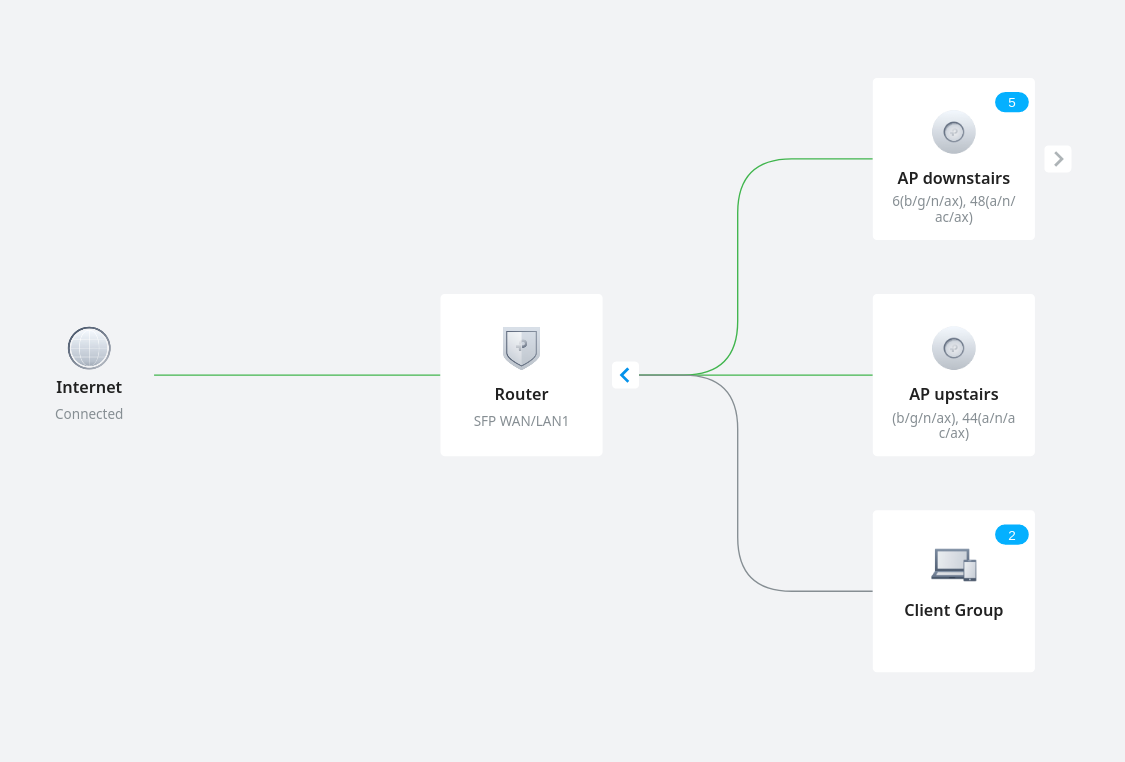
The router is a fanless 3-in-1 Gigabit router, PoE switch, and Omada controller. It has 12 ports, of which 2 SFP cages, and a generous 110W PoE budget. The access point just a random Gigabit Wifi 6 device. More than sufficient for my needs for the forseeable future.
Around this time I also found a thread on my ISP’s forum where I learned that my fiber is actually AON, and which type of SFP module I need. I confirmed this information with customer support and the Routershop guy. The module he sold me slots right into the router and worked on the first try. Bye media converter!
I guess I’ll just keep the Raspberry Pi around, and equip it with a PoE+ hat for fun.
The Omada Software
Getting to the same point as the VPP router was a breeze: The setup wizard detected the access points and configured the main WiFi network. Then I just had to go to settings, wired network, internet, select the WAN port, and then under advanced settings put the Internet VLAN to 300. I first did this with the media converter, and once confirmed working, did a speed test, and switched the fiber from the media converter to the SFP module. Once again the test results were indistinguishable. Et voila, new network.
For science, I powered on the old router, to compare the reception upstairs in the furthest corner of the house. With my laptop on my lap I could not even see the old 5GHz network, but putting it down I captured the following image, with in purple the old WiFi, and red and gree respectively the downstairs and upstairs access points. Not only is it obvious why WiFi was so bad upstairs, it also shows how much better the dedicated access points are. The new downstairs AP comes through almost 20dB stronger than the old router. We could probably have made do with just the new downstairs AP.
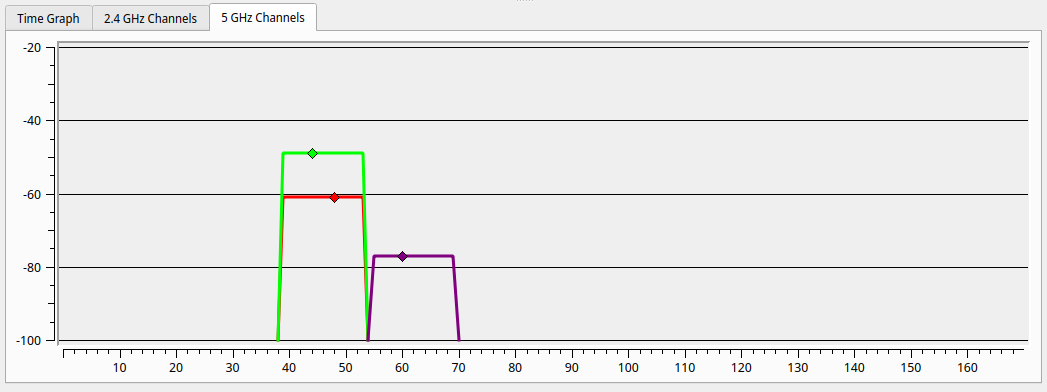
While I’ve repeatedly found that any of the 3 routers can saturate a 1000Mbps link, WiFi is a different story. The new AP is actually 200Mbps faster than the old ISP router, while sitting about 3m away from each. Note that my laptop doesn’t have WiFi 6 so this is probably leaving speed on the table. But of course the wired network remains faster and more reliable.
The one feature missing from the Omada setup compared to VPP is that it doesn’t run a DNS server, so you can’t access devices by their hostname. But if I’m running the Raspberry Pi anyway I could run dnsmasq there if I wanted to. Or even Pihole while I’m at it.
I hear you like LAN so I put a VLAN in your LAN so you can VLAN while you LAN
Now that I have this easy to manage network, it’s time to tick off the last item on my wishlist: put all the IoT stuff on its own VLAN. I found this video quite helpful, even though my setup is a bit different.
I actually have two types of IoT devices. Cloud based ones that I begrudgingly allow internet acccess so that their app works. And local ones that talk to Home Assistant and have no business connecting to the internet.
The cloud one is simple, make a new WiFi network, and tick “guest mode”. This prevents it from connecting to any other device on the network. For the Home Assistant devices, I made a new LAN (purpose: interface, apparently), and gave it a nice VLAN ID and DHCP setup. Then I created another WiFi network, no guest mode, same VLAN ID.
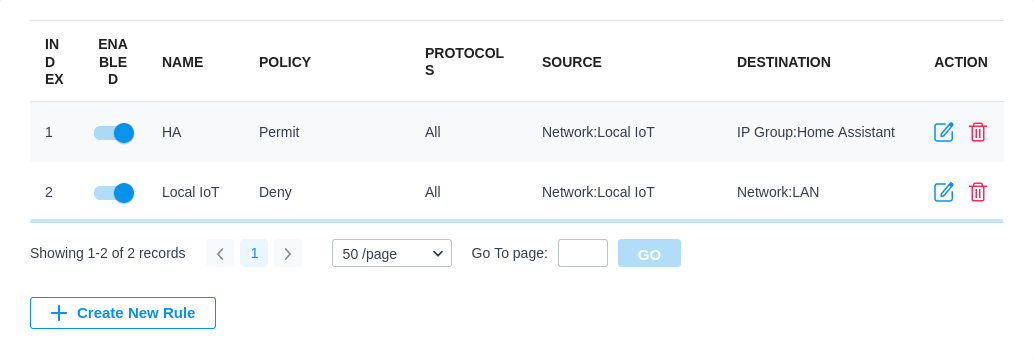
Home Assistant itself actually runs on the main LAN so it can access the internet and it’s easy to target all the IoT devices. First I added a gateway rule from LAN to WAN that denies the IoT network to the IP group Any_IP. Then I added two EAP rules, one that allows the Iot network to a new IP group with just Home Assistant in it (which I assigned a static IP), and then a deny rule that denies the IoT network to the default LAN network.
Conclusion
You can make your own router, but there isn’t really a good reason to in my opinion. I could not find any measureable advantage. You can do it if you are looking for a new hobby, or if you have really specific requirements.
Even if you’re on a budget, the 50 Euro version of this build is just a single WiFi 5 access point, which would probably get you 90% of the way. You could repurpose an old PC if you don’t care about the energy bill and care a lot about your ISP not having remote access to your router I suppose. But with current energy prices the venn diagram of people who can’t afford a new router and care about their energy bill is almost a cricle.
I’m quite happy with the new setup, but in particular the access points are just much better than what’s built into the ISP router.