Wishful Coding

Didn't you ever wish your
computer understood you?

Pokemon Gringo

In Puerto Rico, folk etymology states that the word “gringo” originated from the English words “green” and “go” referring to the desire of some locals to have the U.S. military (who allegedly wore green uniforms) leave the island by telling them: “Green, go!” 1

As a long-time Pokemon fan, I got really excited when I heard about Pokemon Go. But excitement quickly turned into disappointment as I found out the Android runtime on my Blackberry does not support the required API version.

So I took my Gameboy to play some good old Pokemon Red, when a thought struck me. How hard would it be to add a GPS to TCPoke and modify pokered to allow TCPoke to initiate wild Pokemon battles?

I had previously read parts of pokered to understand the serial protocol I needed to make TCPoke, but I never actually wrote Z80 assembly. Luckily, it turned out to be relatively easy. After a few hours I already added an extra menu item to the Cable Club, and a few hours later the menu actually did something.

It’s kind of glitchy and broken, but the diff is surprisingly small.

GBG simulation of Pokemon Gringo

Next up I modified Bill’s Arduino state machine to recognize the new menu item and added some GPS code. Again, it took a few hours, but the diff is again relatively small. (Except for this huge chunk of Pokemon level and location data I extracted from pokered)

But at this point I only had the code running in BGB/Gambatte (which I even modified to emulate BIll’s Arduino), so I had to order a flash cart to load the modified ROM onto my Gameboy. After camping on the doormat for a week, ignoring friends and family and only leaving the house outside delivery hours, today I finally received the cart and could begin testing on real hardware.

First boot

It almost worked on the first try! There were some small bugs in the Arduino code, which I could not test up to this point. Then I did a few rounds around the block, carrying my whole laptop+Teensy+Gameboy around for debugging. The first Pokemon I encountered made me almost jump into the air from excitement and surprise.

Pokemon Gringo really captures that feeling of surprise when you’re happily trodding along when suddenly…

GBG simulation of Pokemon Gringo

For the best experience I recommend turning up the volume all the way and physically walking though tall grass.

Here is a video of me walking to the supermarket with my new gear.

Published on

AVR pseudo-DMA

I’ve been thinking about making my own 8-bit retro hand-held console, not unlike a GameBoy Color. 8-bit microcontrollers and buttons are easy to come by, memory, sound and a display not so much.

The Atmega2560 used in the Arduino Mega has support for external memory, which is nice. This allows up to 64kb of RAM, and even more if you implement bank switching.

The display is an unsolved problem for me so far. Sure, there are dozens of display shields and breakouts, but pushing pixels over a serial bus with an AVR is just too slow. If you just make the Arduino sit in a busy loop sending bytes over SPI at top speed, it takes hundreds of milliseconds to update the whole screen.

The proper way to do it seems to be to have a framebuffer that you DMA to the screen controller, while the CPU is busy making the next frame. Except the only chips I found that support DMA can hardly be considered retro, and often not even 8-bit. We’re talking 32-bit, 100Mhz chips like AVR XMega, dsPIC or ARM Cortex-M3 here. While the GameBoy does all of that at 4Mhz. I’m not sure what kind of black magic that is.

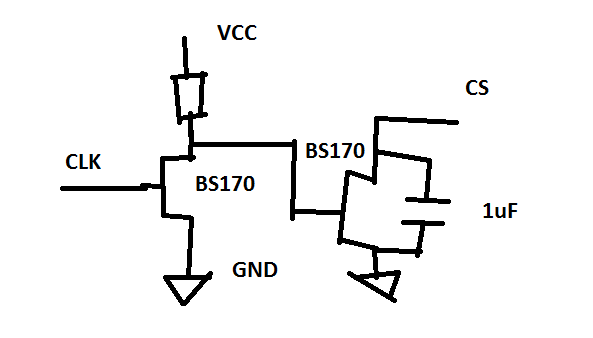
In this moment of despair, I came up with a way to do something like DMA on the Arduino Mega. I figured that with a couple of diodes I could transfer data from a RAM chip to the screen.

Normally you’d connect both the RAM and the screen to the SPI lines and give them a chip-select line each. What I did is disconnect the MISO of the screen and connect the MISO of the RAM to the MOSI of the screen. This way, if you lower both CS lines and send a zero, a byte is transferred from the RAM to the screen.

Pseudo-DMA Schematic

The hack that makes this work combines code from Adafruit_ILI9341 and Adafruit_FRAM_SPI, which results in the following glorious disaster

void framDMA() {
  // set up the display
  spi_begin();
  tft.setAddrWindow(0, 0, ILI9341_TFTWIDTH-1, ILI9341_TFTHEIGHT-1);
  // set up the RAM
  digitalWrite(fram._cs, LOW);
  fram.SPItransfer(OPCODE_READ);
  fram.SPItransfer(0);
  fram.SPItransfer(0);

  digitalWrite(tft._dc, HIGH);
  digitalWrite(tft._cs, LOW);
  // at this point BOTH the display and FRAM are active
  // Send zero's
  for(int i=0; i<ILI9341_TFTWIDTH; i++) {
    for(int j=0; j<ILI9341_TFTHEIGHT; j++) {
      SPDR = 0;
      while(!(SPSR & _BV(SPIF)));
      SPDR = 0;
      while(!(SPSR & _BV(SPIF)));
    }
  }
  // release the cs lines
  digitalWrite(tft._cs, HIGH);
  digitalWrite(fram._cs, HIGH);
  spi_end();
}

I think it’s a nice hack, and if you rewrite the loop as an ISR it could definitely free up CPU cycles. But the actual updating of the screen is still too slow for any sort of annimations.

Published on

Breaking the Respondus Lockdown Browser

At the University of Twente there was a pilot program for digital testing using Pearson MyLabsPlus in the Respondus Lockdown Browser. This browser is supposed to stop students from using their laptops for other things besides the test.

It does this by minimizing all applications, disabling a bunch of things and maximizing itself. It also forces you to shut down software such as Skype and Steam.

After the test, a friend mentioned he had received a notification from WhatsApp web during the test. Surely enough, I could easily reproduce this with a few lines of JS using the notification API.

This got me thinking if you could show other things on top of Respondus Lockdown Browser. I literally copied some code for making a transparent always-on-top window in Java, added a Thread.sleep (so it would open after I started Respondus) and I was in business.

A little more copy-pasting and a dozen lines of Swing and I had a transparent WolframAplha client sitting on top of my lockdown browser.

WolframAlpha client on top of Respondus

I’ve become convinced Respondus is selling snake oil, pure snake oil. To drive the point home, another friend demonstrated you could run Respndus Lockdown Browser in a virtual machine.

Respondus in a VM

Time-line of events:

  • 10 June 2016
    • 13:45 - 15:45 Math exam
    • Intensive hacking
    • 23:08 University of Twente and Respondus notified
  • 12 June 2016, UT says they will bring it up with respondus

Respondus never even responded.

Below is the result of my copy-pasting. I didn’t even bother to rename anything.

import java.awt.*;
import java.awt.event.*;
import javax.swing.*;
import static java.awt.GraphicsDevice.WindowTranslucency.*;
import java.awt.image.BufferedImage;
import javax.imageio.ImageIO;
import com.wolfram.alpha.WAEngine;
import com.wolfram.alpha.WAException;
import com.wolfram.alpha.WAImage;
import com.wolfram.alpha.WAPod;
import com.wolfram.alpha.WAQuery;
import com.wolfram.alpha.WAQueryResult;
import com.wolfram.alpha.WASubpod;

public class TranslucentWindowDemo extends JFrame {
    private static String appid = "wolfram app id";
    private WAEngine engine = new WAEngine();
    private JLabel picLabel = new JLabel();

    public void requestWA(String input) {
        WAQuery query = engine.createQuery();
        query.setInput(input);
        try {
            // For educational purposes, print out the URL we are about to send:
            System.out.println("Query URL:");
            System.out.println(engine.toURL(query));
            System.out.println("");
            
            // This sends the URL to the Wolfram|Alpha server, gets the XML result
            // and parses it into an object hierarchy held by the WAQueryResult object.
            WAQueryResult queryResult = engine.performQuery(query);
            
            if (queryResult.isError()) {
                System.out.println("Query error");
                System.out.println("  error code: " + queryResult.getErrorCode());
                System.out.println("  error message: " + queryResult.getErrorMessage());
            } else if (!queryResult.isSuccess()) {
                System.out.println("Query was not understood; no results available.");
            } else {
                // Got a result.
                System.out.println("Successful query. Pods follow:\n");
                for (WAPod pod : queryResult.getPods()) {
                    if (!pod.isError() && !pod.getTitle().equals("Input") && !pod.getTitle().equals("Input interpretation")) {
                        System.out.println(pod.getTitle());
                        System.out.println("------------");
                        for (WASubpod subpod : pod.getSubpods()) {
                            for (Object element : subpod.getContents()) {
                                if (element instanceof WAImage) {
                                    WAImage waimg = (WAImage)element;
                                    waimg.acquireImage();
                                    System.out.println(waimg.getFile());
                                    System.out.println("");
                                    BufferedImage myPicture = ImageIO.read(waimg.getFile());
                                    picLabel.setIcon(new ImageIcon(myPicture));
                                    SwingUtilities.invokeLater(new Runnable() {
                                      public void run() {
                                        revalidate();
                                        repaint();
                                    }});
                                    return;
                                }
                            }
                        }
                        System.out.println("");
                    }
                }
                // We ignored many other types of Wolfram|Alpha output, such as warnings, assumptions, etc.
                // These can be obtained by methods of WAQueryResult or objects deeper in the hierarchy.
            }
        } catch (Exception e) {
            e.printStackTrace();
        }
    }
      
    public TranslucentWindowDemo() {
        super("TranslucentWindow");
        setUndecorated(true);
        getRootPane().putClientProperty("Window.shadow", Boolean.FALSE);
        getContentPane().setBackground(Color.WHITE);

        setLayout(new FlowLayout());

        engine.setAppID(appid);
        engine.addFormat("image");
        //requestWA("integrate x^2");

        addMouseListener(new MouseAdapter() {
            @Override
            public void mouseEntered(MouseEvent me) {
                setOpacity(0.55f);
            }
            @Override
            public void mouseExited(MouseEvent me) {
                setOpacity(0.1f);
            }
        });

        setSize(300,200);
        setLocationRelativeTo(null);
        setDefaultCloseOperation(JFrame.EXIT_ON_CLOSE);

        //Add a sample button.
        final JButton button = new JButton("Solve");
        final JTextField textfield = new JTextField(20);
        ActionListener submitListener = new ActionListener() {
          public void actionPerformed(ActionEvent ae){
            requestWA(textfield.getText());
          }
        };
        button.addActionListener(submitListener);
        textfield.addActionListener(submitListener);
        //add(button);
        add(textfield);
        add(picLabel);
    }

    public static void main(String[] args) {
        try {
        Thread.sleep(10000);
        } catch (InterruptedException e){}
        // Determine if the GraphicsDevice supports translucency.
        GraphicsEnvironment ge = GraphicsEnvironment.getLocalGraphicsEnvironment();
        GraphicsDevice gd = ge.getDefaultScreenDevice();
	final Rectangle rect = gd.getDefaultConfiguration().getBounds();

        //If translucent windows aren't supported, exit.
        if (!gd.isWindowTranslucencySupported(TRANSLUCENT)) {
            System.err.println(
                "Translucency is not supported");
                System.exit(0);
        }
        
        //JFrame.setDefaultLookAndFeelDecorated(true);

        // Create the GUI on the event-dispatching thread
        SwingUtilities.invokeLater(new Runnable() {
            @Override
            public void run() {
                TranslucentWindowDemo tw = new TranslucentWindowDemo();

                // Set the window to 55% opaque (45% translucent).
                tw.setOpacity(0.1f);
                tw.setAlwaysOnTop(true);

                // Display the window.
                //tw.pack();
		tw.setLocation((int)rect.getMaxX()-400,(int)rect.getMaxY()-300);
                tw.setVisible(true);
            }
        });
    }
}

I’m not sure it’s wise to release a “weaponized” version of my “exploit”, but I think anyone who can figure out how to compile and run this code and its dependencies knows enough to do the copy-pasting.

Published on